
For more than 40 years, the Ford F-150 has been one of America’s most popular passenger vehicles. With its robust design and spacious interior, the Ford F-150 is a great vehicle for transportation and leisure. With proper maintenance, F-150 models generally give users years of reliable performance. Over the course of seven decades and more than 13 generations of trucks, Ford is the automotive choice for millions of drivers.
As popular as Ford trucks remain, each model has had its share of problems, though. Whether the issue is aesthetic or mechanical, it is crucial to understand these issues so that you can be better prepared for any common maintenance needs or know what to look for when considering the purchase of a used Ford F-150.
Quick Links:
Common Issues With 2015-2017 Ford F-150 Pickup Trucks
For the 2015-2017 Ford F-150, common problems range from interior mishaps to issues with functional components. 2015 Ford F-150 problems have largely centered on transmission issues that lead to rough shifting. Ford F-150 problems in 2016 models also include engine problems.
Ford truck transmission problems have frequently arisen in newer F-Series models. Ford F-150 problems in 2017 have prompted a large recall over a faulty transmission gear indicator.
While it is still early in the life of these newer trucks, here’s a rundown of some other common issues that owners have experienced so far.
1. Generation 13 MyFord Touch Complaints
The Ford F-Series has had several reported problems with its MyFord Touch feature. Though intended to enhance the technological options of the console, the feature has been found unreliable by many owners.
Consequently, vehicle buyers have threatened the automaker with a class-action lawsuit. The litigants claim the glitchy characteristics of MyFord Touch have disabled certain vital vehicle commands. For example, complaints have emerged that the prompts of the feature fail to enact the defroster or rear-view camera on F-150s. Other reported problems with the feature include diminished temperature control and navigation.
2. Frozen Handle Truck Recall

One of the biggest problems with 2015-2017 F-Series trucks has been a frozen door handle latch issue. In subzero temperatures, the latch will often fail to engage with the door striker. Consequently, the door might fly open when the truck is in motion.
The door has also been known to freeze shut and lock the driver inside.
The frozen handle issue was the subject of a lawsuit that, while dismissed in court, led to the automaker’s recall of some 1.3 million trucks in October 2017. Ford issued a statement saying they would augment the trucks with water shields over the latches to remedy the issue. The recalled trucks were manufactured at the automaker’s Kentucky, Michigan and Missouri assembly plants.
3. Gearshift Recall

A transmission issue with the 2017 Ford F-150 has led to a recall of 15,000 trucks. According to the automaker, the 10-speed gear in its 2017 trucks is intended to keep the vehicle in the same gear, regardless of the shift-lever position. Unfortunately, the feature has resulted in gearshifts that disengage from the transmission and render the vehicle incapable of shifting.
In the worst-case scenario, the shift lever might read the truck as parked while the transmission is still in motion.
4. Electronic Throttle Body Malfunction
Electronic throttle bodies have been a long-reported issue in Ford vehicles. In today’s Ford F-Series trucks, the electronic throttle body (ETB) is data-controlled. The ETB transmits sensory data to the throttle valve, which controls the quantity of air that passes to the engine. In recent model Ford F-150s, an error called “limp mode” sometimes occurs, where the ETB stops reading and the truck abruptly loses momentum.
Due to the high frequency of “limp mode” problems on 13th-generation F-Series models, replacement parts often have to be back-ordered. Consequently, Ford has told customers to hang tight for durations that could last weeks.
However, despite the fact that a failing ETB can resume functioning, experts say it is not worth the risk to drive a truck after an incident of “limp mode.” If you have a failed ETB, replace it immediately. If you must wait for parts, use a secondary vehicle or rental car in the meantime.
5. Seat Cooling Issue

On recent F-Series models, drivers have raised complaints about the seat cooling function. In some trucks, the seat will cool briefly and then the function will fail. Some users have said the function will work on the base of the seat, but not along the back. According to reports, the hose that provides airflow to the seats often comes undone. The 2016 Platinum has been a frequent subject of this issue.
Shop 2015-2017 Ford F-150 Parts »
Common Issues With 2009-2014 Ford F-150 Pickup Trucks
Common Ford truck problems in 2009-2014 F-Series pickup trucks have run the gamut from digital-system malfunctions to problems with the master cylinder, the ignition coil, the gaskets and various other components.
1. Generation 12 MyFord Touch Complaints
In Ford’s Generation 12 F-150s, complaints have arisen about the unreliability of MyFord Touch1 — a touchscreen feature in Generation 12 and 13 models. Since 2010, drivers have cited the feature as one of the main reasons for Ford’s declining ratings in user satisfaction.

Early users of the touch-screen feature reported it would abruptly stop working. Moreover, the commands were variably unresponsive and the system did not synchronize with smartphones. In 2014, Ford responded to these complaints with a redesigned user interface meant to enhance the performance of MyFord Touch. Despite these efforts, complaints about the system have continued with newer models in the F-150 series.
Recurrent complaints about MyFord Touch have described the following performance issues:
- The screen fails to return once it goes into energy-saving mode.
- The sync system freezes and remains inoperable once the driver has shut the truck off.
- The system fails to recognize smartphones, despite the automaker’s efforts to remedy this issue.
- The rear-view camera shuts off when the truck is in reverse.
The system has reportedly proven incompatible with portable MP3 players. Once frozen, MyFord Touch has even failed to reboot in trucks where someone has removed and reinstalled the battery.
MyFord Touch has also been reportedly difficult to use in colder weather. Moreover, users claim the system is difficult to update. In fact, most users have needed to visit the dealership for upgrades. Ever since Ford removed buttons from the interface, users have claimed commands are difficult to input when wearing gloves or with long fingers.
Before the rollout of MyFord Touch, Ford trucks ranked fifth among non-luxury vehicles in customer satisfaction. Within two years of the introduction of the touchscreen system, the automaker dropped to 23rd out of 32 brands. While this may not have been the only factor in the ranking drop, it definitely didn’t help the F-150’s case.
2. Passenger Side Head Gasket Leak
Many drivers of 2009-2014 Ford F-150s have reported that many trucks suffer from ill-assembled head gaskets, and oil is liable to leak from the passenger side. According to auto experts, the leaks are the result of overheating, overfilling and the disintegration of gasket coating. Leaks first become evident by the smell of burnt oil. Owners of the Ford F-150 have most often reported such leaks after driving the truck at least 160,000 miles.
While a new head gasket can be costly, some fix the problem by applying a JB Weld bond to the leaking area.
3. Engine Oil Pan Gasket Leak

An oil pan gasket leak can also occur when engine oil accumulates in the exhaust system of a Ford F-150. As with the head gasket leak, the telltale sign is when the smell of burning oil emits from the engine. A pan gasket is far more affordable to replace and is a relatively easy DIY task. According to reports from select owners of the F-150, they avoided the problem with a periodic tightening of the bolts around the pan gasket.
4. Rough-Running Engine
Generation 12 F-150s have been known to run rough when the engine is idling. The problem is typically the result of sticking exhaust gas recirculation sensors. The sensors stick due to the accumulation of carbon. Ford experts recommend drivers change the sensors every 100,000 miles. Once a truck has accumulated that many miles, the sensors start to wear down, which, in turn, can leave the engine unbalanced.
If the mass airflow (MAF) sensor becomes clogged, the cause will typically be a dirty hot wire. This problem will also cause the engine to run rough when idling. While it can help to clean the sensor, it is often better to buy a new one. Replacement valves are generally affordable and can help improve the engine running of an F-150.
If you do decide to try cleaning the MAF sensor, be sure to only use MAF sensor-specific cleaner. Many try to use throttle body cleaner on their MAF sensors and this often does more harm than good.
5. Ignition Coil Failure

When excessive gaps appear in the spark plugs, the ignition coils stop working. Without functioning ignition coils, the engine is liable to misfire. Sparkplug gaps are an inevitable result of wear. For improved longevity, lubricate the plugs with dielectric grease. This step will prevent wear of the rubber seal and the possibility of water damage.
6. Power Rear Sliding Window Defroster Failure
For trucks that have a power rear sliding window with integrated defroster, a common problem is a failure in the defroster’s electrical contact. There is a small tab located on the lower edge of the moving portion of the window and then another small contact tab on the lower portion of the fixed window pane. This contact fails, causing the defroster to stop working. If the truck also has heated sideview mirrors, the heat function will stop working as it is part of the rear window defroster circuit. Ford has not issued a recall against this defect, and the published fix is to replace the entire rear window assembly.
7. Transmission Shifting Problems
Ford issued a recall notice on the automatic transmission in the 2009-2012 F150s. Some transmissions in this year range reportedly started downshifting into second gear without warning. At any speed, but especially at highway, this could be dangerous. The fix is a simply flash update. This update has been known to cause the gear indicator numbers, located in the center gauge display, to disappear. While this doesn’t affect the vehicle’s performance, it’s annoying.
8. Coil Spring Breakage
This year range of F150 commonly experiences coil spring breakage around the 100k mile mark. The coil springs will crack, but not necessarily break into two pieces. Either way, this is a problem that will need to be fixed. The mechanics that we spoke with recommend replacing both coil springs once one is found broken.
9. 4WD Vacuum Actuator Failure
Ford uses vacuum actuators to engage and disengage the four wheel drive hubs in these pickups. This is what allows Ford to use a dash knob in place of the traditional floor shifter. These actuators are known to fail, though, which can result in excessive damage to a number of components in the four wheel drive setup. When the vehicle is in 2WD, the actuators hold vacuum pressure on the shafts to keep them from engaging. When the vehicle is in 4WD, the actuators release the vacuum pressure, and the shafts then engage. When the actuator seals start to fail, they lose pressure, which then allows the shafts to partially engage on their own. If you are driving and hear what sounds like gears grinding under the front of your truck, this is most likely what’s going on. The problem is that by the time you hear this noise the damage has already occurred. If you hear this noise while you’re driving, you can try shifting into 4WD and then out of 4WD, which should fully engage and then disengage the shafts. There’s a chance that one, or both, shafts may stick in the engaged position, though. Your best bet is to have the vehicle serviced as soon as possible in order to avoid further damage. If you’re lucky you may only have to replace the actuator(s), but most likely you’re looking at a much more extensive repair that will most likely cost $1.5-2k.
Shop 2009-2014 Ford F-150 Parts »
Common Issues With 2004-2008 Ford F-150 Pickup Trucks
These years of Ford F-150 pickups had a number of reported issues, from spark plugs to airbags to window components. 2005 Ford F-150s also had engine problems in the form of ticking noises. Up through 2007, the F-150 also had some reported engine problems related to the cam phaser.
1. Spark Plugs Breaking Off
When it comes to Ford 4.6 spark plug problems, the years 2004 through 2008 were troublesome for the F-Series. Likewise, Ford 5.4 spark plug problems have been common on models from these years as well.
One of the most complicated Ford truck spark plug problems has been the issue of plugs that won’t come out intact. If you attempt to take out the spark plugs in the three-valve engine of a 2004-2008 F-150, the tips are liable to break off and leave the remainder lodged in the cylinder. The problem is partially due to the supposedly long service life of the plugs, which are supposed to last for 100,000 miles. The problem with that span is that it places the truck outside its normal warranty.

Ford developed a plug with a two-piece shell that can work well if treated every 30,000 miles. However, the plug will not generally last for the 100,000-mile intervals the automaker encourages. Somewhere inbetween those two mileage intervals, the plugs are liable to bond to the electrodes. Most problematically, a weld at the bottom of the socket holds the plug down as you try to pull it out, which is what causes the plug to break.
When the head of a spark plug breaks off, extracting the remainder can be a very difficult process. Even professional mechanics have trouble accomplishing the task. In 2004-2008 models F-150 spark plug problems are among the costliest of repair expenses associated with the F-Series.
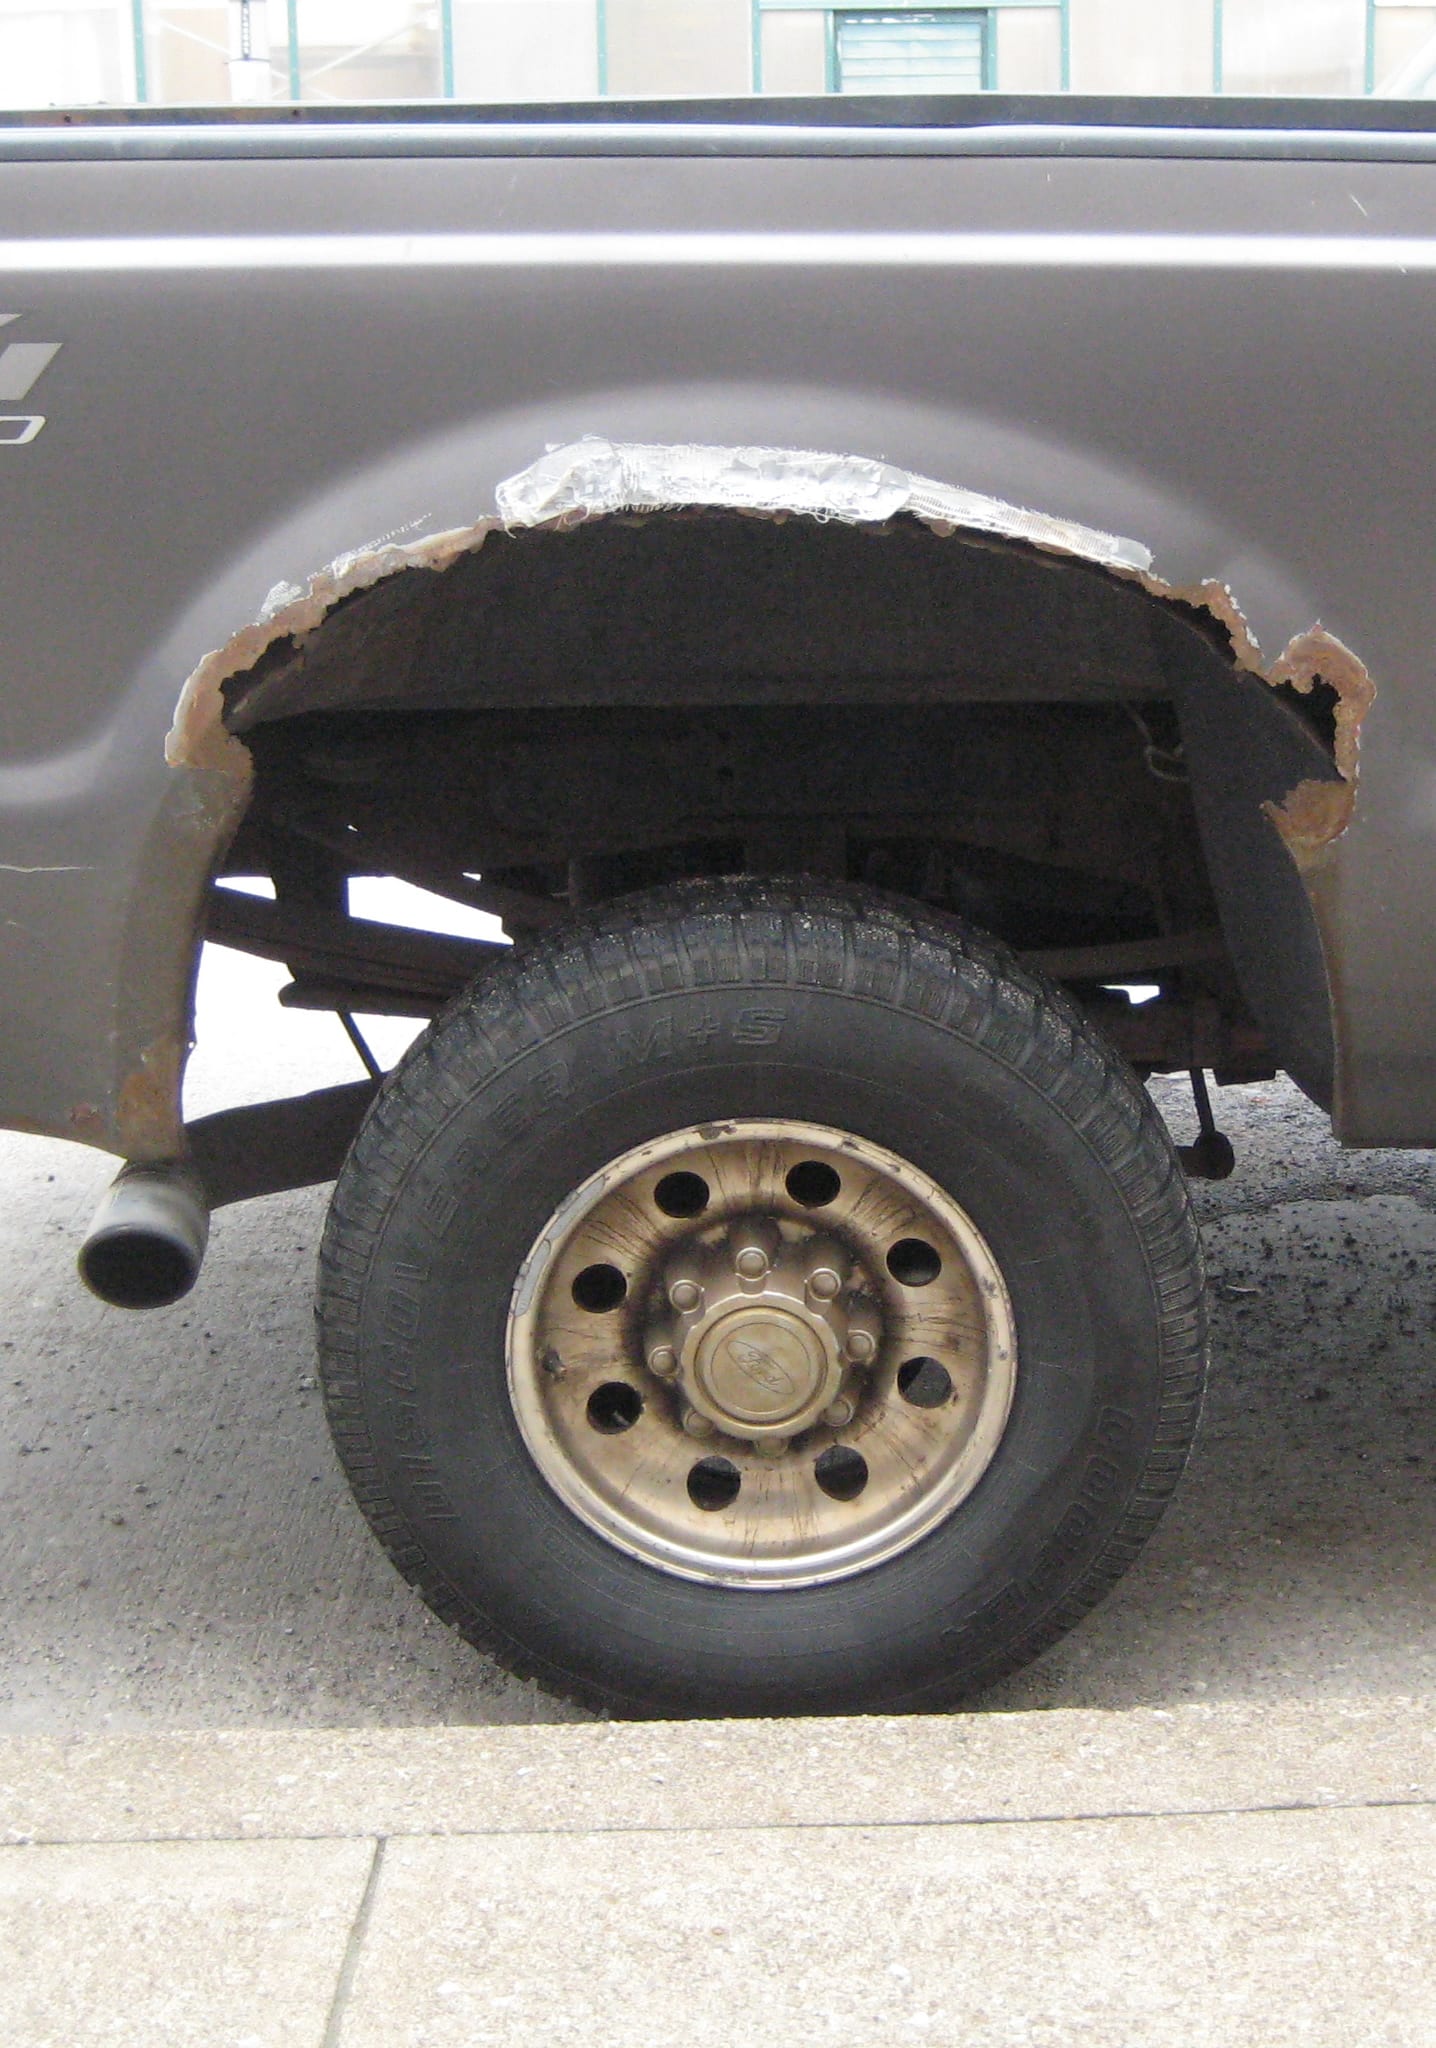
2. Aluminum Hood Corrosion on Ford Hoods
During the mid-2000s, Ford received a slew of customer complaints about corroded auto parts on its new models. The problem centered on the hoods of the automaker’s 2000-2007 F-150s.
Corrosion has also been an issue for fuel tank straps in some trucks. On Heritage edition 2004 F-150s, corrosion of the fuel-tank straps led to a recall of the model. The problem was causing tanks to drop off, in addition to disconnections between the tank and the fuel line.
3. Airbag Deployment Issues

Another issue with mid-2000s F-150s concerned the abrupt, undesired deployment of the driver-side airbag. Drivers reported the issue on 2005-2006 models of the truck, and it eventually led to a recall that involved over 144,000 trucks. If you look to purchase a used 2005-2006 F-150, make sure that this recall was addressed.
4. Window Component Failure
Drivers of 2004 and 2005 F-150s reported a problem concerning windows. The issue involved the power regulators on door-side windows, which were failing and causing window panes to drop into the doors or to become stuck or make a grinding noise.
5. Loud Ticking/Knocking Noise From the Engine
Problems with the cam phaser have also been reported on these F-150s. Signs of this problem typically include sounds that resemble clicks and knocks coming from the engine. At the time the problem was being reported, Ford dealers allegedly claimed the sounds indicated nothing problematic about the engine. Consequently, drivers ignored the issue and engines failed as a result.
Some auto experts have advised F-150 drivers to steer clear of the Triton 5.4-liter V8 because of costly problems associated with the engine.
Shop 2004-2008 Ford F-150 Parts »
Common Issues With 1997-2003 Ford F-Series Pickup Trucks
From 1997 through 2003, Ford pickup truck models were the subject of numerous complaints concerning age-old issues such as engine noise, head gasket leaks and window seal leaks. Most prominent, however, have been the controversies surrounding tank delamination and spark plug ejection.
1. Spark Plug Ejection
In 1997-2003 models of the Ford F-150, the most commonly reported problem with the truck was with ejecting spark plugs. Drivers have put forward several different theories regarding the cause of this problem. Some auto experts have claimed the plug design was flawed from the outset, claiming that the cylinder heads that consist of weak, four-thread aluminum supposedly compounded the problem.
Another theory asserts the spark plugs were too torqued and insufficiently tightened on the production line. As such, the sparks were prone to vibrate and erode the threads of the aluminum. Once worn, the aluminum would fail to hold the spark plugs in place.
The Ford pickups that are likeliest to blow spark plugs are the 2001-2004 F-150 models. Nonetheless, drivers have also reported the problem in 1997-2000 and 2005-2008 F-150s.
In response to the complaints, Ford initially asserted the issue was the result of users over-torquing replacement spark plugs. However, F-150 owners were mostly complaining about ejections of the original spark plugs that came with the vehicle.
Shop 1997-2003 Ford F-Series Parts »
Common Issues With 1987-1996 Ford F-150 Pickup Trucks
Ford truck transmission problems were common on F-Series models of the early and mid-1990s. Likewise, F-150s from this period and even earlier have had issues with the alternator belt, ball joints and suspension.
1. Alternator Belt
On 1990 to 1994 model F-150s, the alternator belt has been the subject of numerous complaints. A telltale sign of trouble is when the engine makes chirping or squealing noises. The sounds are an indicator that the pulley for the air conditioner or the power-steering is askew.
2. Automatic Transmission
If the TR/MLP sensor is faulty, the transmission is liable to fall out of alignment. Consequently, the engine might flare as you shift the truck into fourth gear. Drivers have reported this problem most commonly in 1994-1995 model F-150s.
On 1990-1993 models, flare-up issues with the transmission have also been reported. However, the problem occurs when drivers shift the truck between the second and third gears. On these vehicles, Ford has attributed the issue to distorted valve plates.
3. Ball Joints
On 1990-1996 Ford F-150s, the ball joints have been particularly vulnerable to water exposure. If exposed, the ball joints are liable to expire prematurely. Consequently, you will need to change them out for new ones.
4. Hard Starting

Drivers have reported complaints of hard-starting on 1990-1996 model F-150s. Ford attributed this issue to faulty harness wiring in the power control module. Symptoms of the problem include vehicular stalling, hesitation and failure to start.
On 1995 and 1996 Ford trucks, hard-starting has also been linked to a stuck idle air control valve. An engine that cranks and stalls or fails to start altogether indicates this problem.
5. Suspension Problems
Owners of 1991 to 1994 Ford trucks have reported problems with the front suspension system. The problem is due to weak leaf springs along the front of the vehicle. To fix the issue, get newer, stronger leaf springs.
If the truck has twin-axle suspension, cupping is liable to occur with the front tires. You can remedy the issue with new springs or added leaves. However, some cases require the change-out of additional replacement parts. In any case, you must get the suspension properly aligned.
6. Vehicle Noise

Drivers have reported complaints of rear noise on 1990-1996 Ford trucks. The noise resembles a chattering sound and occurs during soft turns after driving the vehicle at high speeds. The problem is down to one of two causes — an insufficient friction modifier or a faulty Traction-Lok differential. If the rivets are loose on the frame, change out the rivets for bolts.
7. Recall History
In 1993, the Ford F-150 with Touch Drive was the subject of a recall. The issue involved the transfer case, which tended to fall out of high gear when the vehicle was coasting. Another issue from the same year involved Fords with dual fuel tanks, which were recalled due to system issues. The problem stemmed from the regulator, which could wear prematurely and lead to high-system fuel pressure.

On 1993 Ford F-150 (and F-250 and F-350) models with speed control systems, internal leaking was linked to the deactivation switch. Ford attributed instances of overheating to the problem, which could potentially cause fires. To remedy the problem, Ford issued a recall to install fused wiring harnesses on F-150/250/350/450 models.
In 1994, Ford received complaints about its airbag in F-150/250 models. The issue involved improper airbag deployment. According to some reports, the airbag and warning light would regularly malfunction. Alternately, the airbag would deploy if someone slammed the passenger door at the same time the driver started the ignition.
Shop 1987-1996 Ford F-Series Parts »
Evolution of Ford Pickup Trucks(1948-1986)
Ford has developed its trucks over the last seven decades through with amazing advancements in engineering, technology and manufacturing. Between the late 1940s and mid-1980s, the automaker progressed through seven generations of the F-Series that resulted in the development of the Ford F-150 that we know today.
Here’s a quick look at these classic models.
1. 1948-1952
The Ford Motor Company unveiled its F-Series in January 1948. Billed as the automaker’s “Bonus Built Line,” models in the series ranged from half-ton pickups to the three-ton F-8.
In 1951, Ford made numerous revisions in the series, including altered cabs, fenders, grilles and hoods. Moreover, engineers enlarged the dashboard for improved viewing access. 1951 models also had foamier cabs with two-tone upholstery and assorted comfort features. The 1951 model was rated 100 horsepower.
Further alterations came on the 1952 model, which had a six-cylinder engine with 101 horsepower.
2. 1953-1956
In 1953, Ford unveiled its second generation of models in the F-Series. The trucks now had longer hoods and grille bars. Ford also redesigned the cabs with larger windows. The series was now billed as the “Economy Line Truck” and featured a new emblem that depicted a gear cog with a lightning bolt in the middle. The F-1 series was now suffixed with two extra digits. F-100s now offered automatic transmission.
In 1954, Ford replaced the flathead V-8 engine in its trucks with the overhead-valve V-8 the automaker had used in its cars for two years running. The engine, now called the “Y-Block,” generated 15 percent more horsepower than prior models. From this year forward, automatic transmission was extended to trucks in the F-250 and F-350 lines.
In 1955, Ford changed the upper bar of the grille from vertical to V-shaped. F-100s were also now equipped with power brakes. The following year, the automaker introduced wraparound windshields and redesigned dashboards to the F-Series.
3. 1957-1960
In 1957, Ford unveiled its third-generation F-Series, which featured a more modern look. Trucks in the series now included wider cabs and hoods with flush-mount fenders. Engines were now rated 139 horsepower.
In 1958, Ford redesigned its trucks to incorporate quad headlights. This move was accompanied by the introduction of the Super Duty model of trucks that featured engines with 534 cubic inches.

In 1959, the eight-foot bed started gaining on the six-and-a-half-foot bed in Ford trucks. Also, the Flareside bed was now being eclipsed by the smoother Styleside.
4. 1961-1966
In 1962, Ford redesigned its F-Series grilles with crossbars instead of the Ford nameplate.
In 1963, Ford produced F-100s with Flareside, Styleside and cab-integrated Styleside bed designs, the last of which promptly got discontinued.
Starting in 1964, the automaker designed F-Series trucks to accommodate air conditioners. The following year, they unveiled coil-spring front suspension. 1965 and 1966 models feature the front-fender TWIN I-Beam emblem.
5. 1967-1972
Ford restyled its trucks yet again in 1967, when the automaker unveiled its fifth generation of the F-Series. In 1968, a law passed that required automakers to incorporate side reflectors or side lights on all cars and trucks. Ford altered its hood emblems to accommodate side reflectors.
In 1968, Ford introduced engines of 360 and 390 cubic inches. They also made changes to F-Series armrests, door handles, heat controls and window levers. On the bottom bedside panels, Ford added marker reflectors to bring the trucks up to date with federal regulations.
In 1970, Ford also introduced the Ranger XLT. With its vinyl upholstery and convenient features, the vehicle marked the automaker’s drive toward luxury and comfort.
Over the next two years, the automaker altered its trim on the F-Series. Brighter, colorful upholstery was a hallmark of 1972 Ford models.
6. 1973-1979
1973 ushered in the sixth generation of the Ford F-Series. The grille on newer models contained dual metallic inserts split with an aluminum bar. Along the top of the grille, the name “FORD” was spelled out in letter-spaced upper-case.
In 1974, Ford gave its F-Series trucks added dimension in the cab. With 22 extra inches in length, the trucks could now feature side-facing jump seats.
In 1975, Ford added a new model to the F-Series — the F-150. Between the F-100 and F-250, the new model featured midway payload capacity.
As America celebrated its bicentennial, the Ford F-Series became the nation’s bestselling truck. The automaker’s success was due in large part to the popularity of the F-150. 1976 models featured square headlamp bezels. From this point onward, body panels used galvanized sheet metal to prevent rust.
In 1979, the automaker rolled out its famous “Built Ford Tough” advertising slogan. Newer models featured rectangular headlamps, while the grilles were available in chrome or black.
7. 1980-1986
The 1980s began with F-Series models that featured independent front suspension with Styleside and Flareside beds. In 1981, Ford introduced an optional downsized V-8 engine — 255 cubic inches — as part of a drive to boost fuel economy.
In 1982, the F-Series featured a blue oval at the heart of the grille, removing the “FORD” letters from the hood. During the early 1980s, the F-Series gained on the car as a popular passenger vehicle, which was due in part to regulations that effectively banished high-performance cars.
In 1984, Ford discontinued its F-100 line because it failed to meet newly revised emission standards. Longtime buyers of that vehicle switched over to the Ford F-150, which became the automaker’s leading full-sized truck.
In 1985, Ford unveiled its fuel-injected 5.0-liter engine as an option for F-Series models. As 1986 brought the seventh generation of the F-Series to a close, the F-150 remained the automaker’s bestselling pickup.
Common Restoration Items Needed for Classic Ford Pickup Trucks

Classic F-Series models from the 1950s to 1970s can require minor to major overhauls to function as a daily driver. In general, a Ford truck restoration will require several of the following components:
- New engine
- Transmission
- Brakes
- Suspension
- Upholstery
- Interior parts
- Quarter panels
- Truck beds
- Window seals
- Hoods
To restore a classic Ford pickup truck, you will need to assess its current condition. Chances are, you’ll need to restore or change several parts to make the vehicle operable again, sometimes a majority of it will need to be reconstructed completely. Some of the first areas to inspect should include the carburetor, the radiator, the spark plugs and the ignition coil.
If you can get the truck to start, issues with the vehicle’s functionality will become readily apparent. Look for signs of leaking or mixed engine fluids. For example, if you see antifreeze in the oil, chances are there is a crack in the engine block. Other things to check include the brake pedals, clutch and gearshift.
Here’s an overview of what the restoration process may entail:
1. Sandblast the Body
The paint job on a long-dormant Ford is liable to be cracked and the body panels possibly rusted in spots. Before you can repaint the vehicle, go over the body panels with a sandblaster to prime the truck for a fresh paint job. The new paint job should be the final step in the restoration after you have restored all the engine parts. In the meantime, a sandblast will prevent the panels from re-rusting.
To prevent sand mist from harming other parts of the truck, remove or completely wrap the drive train and cover any engine parts that might otherwise be vulnerable.
2. Prepare the Engine Components and Other Structural Components
After you sandblast the truck, prepare the restoration of the engine and transmission. At a minimum you will need a rebuild kit. If the engine is stuck you may need a new block. For a classic Ford pickup, an inline six motor would be one of the more authentic options.
The cylinder walls on any old engine that has long sat dormant are liable to be worn down or pitted; therefore, you’ll probably need to reassemble the engine with new parts. You might need to have the motor bored and cleaned at an auto repair shop.
Check the shocks and leaf springs to see whether they are intact or need replacing.
Inspect the brakes. If nobody has driven the truck in 20 years or more, you are liable to find corrosion along the brake lines. Moreover, the drums and wheel cylinders are bound to be worn. Replace the wheel cylinders at a minimum and the entire brake system if necessary. Other parts you might need to replace could include the radiator, the gas tank and the motor mounts.
3. Paint Body and Reassemble

With the original primer sanded off the vehicle’s body, powder coat the frame of the truck if possible. With the color of your choice, apply a new coat of paint to the entire vehicle. If you do not have tools and experience to do this well, have a professional do it. You will be glad you did.
Now that you have the paint job complete, reassemble the vehicle. Put the engine, drive shaft and transmission into place. Other parts to replace at this time would include the lights, windows, weatherstripping and tires. If necessary, reupholster the interior in whichever color or pattern you prefer. Add new carpeting and interior touches.
Trust Raybuck Auto Body Parts
At Raybuck Auto Body Parts, we carry Ford truck body panels and parts for each generation of the F-Series. Whether you wish to restore a classic 1948 truck or repair a more recent model, our catalog is the first place to look. We sell hundreds of parts for F-150, F-250 and F-350 models from each model year range in the history of the F-Series.
We specialize in aftermarket replacement parts that allow lovers of vintage F-Series models to restore their trucks to like-new condition. We also serve as an alternative to the OEM market for replacement parts on newer Ford trucks. Click over to our catalog to see our inventory.




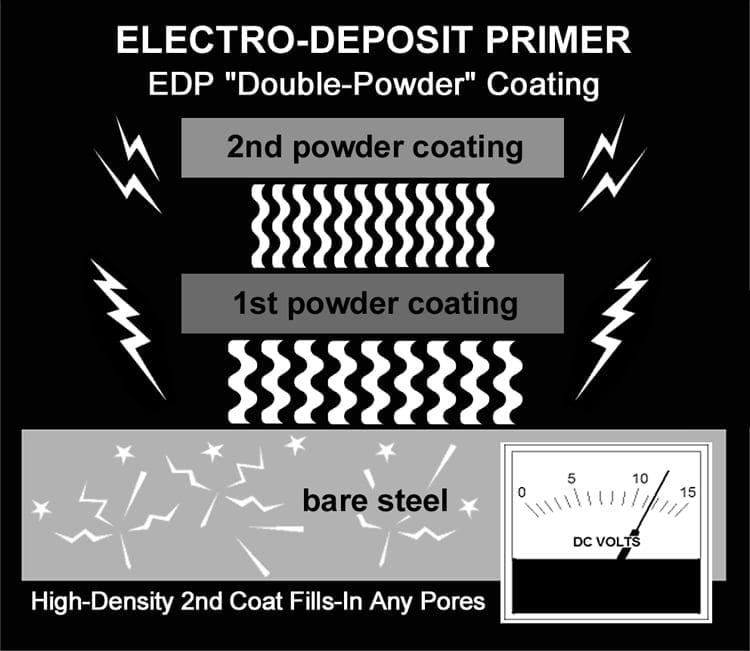
 EDP, or electro-deposit primer, is a protective coating that is applied to steel