
Categories
Tech Articles Truck Talk

1967-1972 Chevy Truck Restoration

1967-1972 Chevy C/K Truck History

The 1967-1972 Chevrolet truck is one of the most popular classic pickups and makes a fantastic start for a DIY restoration project. The second generation of C/K pickups was a major turning point in the Chevy truck evolution. The vehicles, once geared toward the working class, were now suitable for the public. The 1967 C/K models had modern conveniences and more comfort features compared to other light-weight trucks in the automotive industry.

Restoring these trucks gives you the freedom to return the truck to its original look or to modernize it with anything from a fuel injection-based driveline, pro-touring suspension, or maybe just rat rod it. Raybuck Auto Body Parts has top-grade Chevy C10 restoration parts for DIYers and professionals.

Understanding Chevy Truck Terms

With the introduction of the Chevrolet C/K pickup series in 1960, a truck could either be designated with a “C” or a “K.” The C stood for “conventional” and indicated a rear two-wheel drive, and the K indicated four-wheel drive. Chevy made the C/K trucks available in half-ton (C/K10), three-quarter-ton (C/K20) and one-ton models (C/K30).

The C/K10 had a 135 horsepower (HP) V6 engine, the C/K20 had a 150 HP straight-6, and the C/K30 had a V8 with 180 HP. In the beginning, you could choose between long and short beds, along with base or custom trim lines.

You could also pick between two body styles — the “Fleetside”/”Wideside” or the “Stepside”/”Fenderside.”

The Chevy Fleetside had smooth body panels down the side of the bed to give it a more linear look. The Stepside version had contoured panels, which outlined the rear wheel wells. The Stepside also had a step behind the passenger’s side door.

The 1967-1972 GMC vs. Chevy comparison has more similarities than differences. General Motors manufactured the C/K trucks but marketed them under the Chevrolet brand. Some cosmetic differences existed between the two truck lines, such as the grille options.

GMC also used the same C/K prefixes, but implemented 1500, 2500 or 3500 to signify the truck’s tonnage, instead of the 10, 20 and 30 used by Chevy.

Chevy C/K manufactured from 1960-1998

The History of the 1967-1972 Chevy Pickup Truck

The Chevy C/K was manufactured from 1960 to 1998, showcasing innovative designs that set the foundation for future pickups. It was the beginning of light and heavy-duty trucks in the automobile industry with incredible mechanical features and great looks.

Although there were different styles, engines and sizes available within the C/K lineup, the C10 light-duty pickup was the most popular. The Chevy C10 history started with a 6.5-foot bed and 115-inch wheelbase, or an 8-foot bed and 127-inch wheelbase as a second option. The pickup truck increased its load capacity on the front axle to improve the vehicle’s weight distribution and came with a larger windshield and cab.

First-Generation C/K Trucks: 1960-1966

The first generation of C/K Chevy pickups debuted in 1960 with independent front suspension. Other significant features included low-profile seats and a drop-center ladder frame, causing the cab to sit lower than usual. The frame felt like you were riding in a car but with the performance of a truck.

The 1961 model had a fresh grille and an upright hood design. It also had a torsion bar front suspension until 1962, along with trailing arm rear suspension. One year later, Chevy engineered the series with a new front suspension with coil springs. The model also had two engine options, including the L6, also known as the straight-6, with 140 or 165 HP.

The 1963 model gained a new grille but kept the original design of the truck’s body with a few interior modifications. In 1964, Chevy got rid of the wrap-around or curved windshield and air conditioning was available. The 1965 C/K model upgraded to a 220 HP V8 engine to wrap up the first generation in 1966.
Shop 1960-1966 Chevy truck parts »

Second-Generation C/K Trucks: 1967-1972

The second generation of C/K trucks began in 1967. Nicknamed the “Action Line” until 1972, they were also called “Glamour” pickups. The 1967 Chevy truck extended its driver comfortability and convenience with a redesigned exterior, setting it apart from the previous generation — as well as all other pickups in the auto industry.

These changes transformed the C/K from a vehicle used for farming into a truck for everyone.

Major 1967-1972 C10 differences exist throughout each year with changes to the truck’s exterior style, engine options, suspension, transmission and interior comforts.

The 1967 model had a modern look that “wowed” the population with its sleekness. It had a double-wall box constructed of rust-resistant steel and sheet metal. It also sat lower for easy access and was the only model with a small rear window.

Its suspension also went through a massive update. For example, the C/K10 and C/K20 models got an upgrade to a rear suspension coil-spring trailing arm. The system enhanced the pickup’s ride compared to other styles with leaf springs. However, the leaf spring rear suspension was still available and was standard on the C/K30 series.

In 1967, the two-wheel-drive trucks had an independent front suspension while the four-wheel-drive vehicles had a solid axle with leaf springs.

2nd generation Chevy C/K truck

The second-generation Chevy pickups had a standard 3-speed manual transmission. Or, you could customize it to a 4-speed manual, 2-speed automatic Powerglide, Turbo-Hydromatic 350 or 400 3-speed automatic.

Two engine options for the 1967 C/K lineup included the straight-6 and V8, or you could upgrade to one of the two larger V8 versions. Total, there were eight engines available for the second generation.

Key features of the 1967 vehicle included:

  • Bowtie logo in the center of the grille
  • Embedded parking lights
  • Fender emblems
  • Low-angle hood
  • Rectangular grille
  • Small rear window

In 1968, another small block V8 engine hit the production line. The trucks also had an eye-catching change with the addition of offside-marker reflectors on the fenders. The grille no longer had the GMC lettering across the front, and Chevy gave you the option between the Custom Comfort or Custom Convenience package as an advancement.

To celebrate their 50th Truck Anniversary, Chevrolet designed the 1968 C/K models with a white-gold-white theme. The trucks had a white cab roof and rocker panels with a gold body. The company also debuted the Longhorn model in 1968 on the C/K20 trucks, which featured a two-wheel drive option. The Longhorn had a 133-inch wheelbase and an extra 6 inches added to the bed.

One year later, in 1969, the K5 Blazer appeared. It saw a switch from the standard hand emergency parking brake to a foot pedal. It also had a two-spoke steering wheel with a plastic horn button, which replaced the previous chrome wheel with three spokes. The Blazer had upper and lower side moldings to give you a two-tone paint option.

1969 Chevy CK model changes

Significant style changes in 1969 included:

  • Bowtie logo on the hood’s middle leading edge
  • “CHEVROLET” spelled in the center of the grille
  • More vertical hood angle

Halfway through the second generation in 1970, the C/K pickups gained a wider and longer F-body. It also had an updated grille.

In 1971, the series changed to have an “egg crate” grille, along with a new trim package called Cheyenne. Other advancements included:

  • Carpet
  • Chrome trim
  • FM/AM radio
  • Improved interior insulation and padding
  • Lower and upper side molding
  • Parking lights move to the bumper
  • Tailgate trim

The Chevy got rid of the drum brakes and replaced them with discs. The two-wheel-drive models also switched to a five-lug bolt pattern while the 4×4 kept the six-lug design.

1972 Chevy truck was a popular choice

The 1972 Chevy truck was, and remains, one of the most popular choices among enthusiasts, with the 1972 Fleetside C/K being the most aesthetic model.

Several recognizable features include the rearview mirror, which used to be screwed to the top of the cab. The fresh design now had it glued to the top of the windshield. The truck’s door panels highlighted armrests, too. The Sierra, Custom and Sierra Grande trims were available with the drop of the Deluxe.
Shop 1967-1972 Chevy truck parts »

Third Generation (1973-1987) and Fourth Generation (1988-1998) C/K Trucks

After the second generation of C/K engines, the third generation came about, lasting from 1973-1987. In 1988, the fourth generation underwent a name change to GMC Sierra until the series’ end in 1998. Then, the Chevy Silverado replaced the C/K line in 1999.
1967-1972 Chevy truck restoration tips

1967-1972 Chevy Truck Restoration Tips

Every Chevy C/K model between 1967 and 1972 is iconic with a range of aesthetic and performance upgrades. A truck restoration is an exciting project, but you’ll want to take a step back and devise a plan. Understanding your objectives from start to finish can help form a steady progression.

1. Define the Goal of Your Finished Restoration Project

How do you plan on using your Chevy C/K? You may be looking to enter it into car shows or use it for the occasional Sunday drive. Relying on the pickup for daily travel and trips can be an option, too.

Research the parts available for your DIY and make a schedule to match the timeline of your objectives. Another consideration is whether you want to perform a full or partial restoration.

2. Decide on the Type of Restoration

The second step of any restoration project is to determine your end goal. For example, you can restore your classic C/K to its glory days by replicating the interior features, exterior paint job and engine components.

You could also go the restomod route — keep the original look of the truck while adding a few modern upgrades for enhanced performance and comfort. A restomod is a modern twist on components like the drivetrain and suspension. It combines the unique and classic features of the past with today’s technology.

Your third choice is to restore it to your own customizations. You can take ideas from other generations and make the truck something totally unique and your own.

3. Find the Right 1967-1972 Chevy Truck to Restore

If you don’t already have a Chevy pickup, the first step is to find the model you want. Are you looking for a particular body style, horsepower, engine type or interior design? You may be more passionate about the 1967 model’s originality or the 1971’s interior aesthetics. Research is critical during this step to find a truck worth restoring.

C/Ks aren’t too difficult to find because of their high popularity. Look for one with fixable problems that will be worth your time and money.

For example, C10 or K20 with a bent frame may not be the best bet, but a pickup with minor rust and damage but a solid undercarriage is doable. Also, consider your skill level to decide how much you can restore independently.

4. Conduct Diligent Researching and Planning

Once you have the Chevy, research where you can find the exact parts. Start by knowing your truck’s original components, then find a parts dealer that can provide the solutions you need.

At Raybuck Auto Body Parts, we provide top-tier parts as an alternative to expensive OEM and NOS parts. Our inventory of high-quality solutions from reputable manufacturers can help you economically restore your Chevy.

You will also want to build a budget. Restorations can easily become expensive, so it’s important to determine what you need and want from the DIY.

5. Organize an Open Workspace

Working in a spacious and organized area is vital for a smooth restoration project. Have a place for parts, and make sure to label them as needed. Look through the owner’s manual to understand the specifics of what you need.

You can also gather the right tools, equipment and devices before you dive into the process. Keeping your space clean and tidy can be the difference between a fun process and frustrating disorganization.

6. Consider the Available C/K Comforts

Because the second-generation Glamour Chevys are known for their driver comfort and convenience, there are a multitude of interior and exterior designs and features to choose from. Think about the sleek look of the 1967 C/K, its small rear window and rectangular grille. The 1968 model is known for its offside-marker fender, while the 1969 model underwent many style changes.

Having an idea of the exclusive luxuries of each second-gen pickup can help you focus on the truck’s unique details during restoration.

Following these Raybuck pro tips will help you start your project with a solid idea in mind and your budget, workspace and details figured out.

High-Level Steps to Restore a 1967-1972 Chevy Truck

Start by creating a restoration plan to ensure your project meets your expectations. Second-generation C/K trucks experienced a massive change from work trucks to having the comforts of cars for daily transportation — which is why they’re popular for restoration projects.

Look over the truck

1. Look Over the Truck

The 1967-1972 Chevy truck restoration process begins with an examination. You’ll want to inspect the pickup for severe damage, rust and missing parts. If the chassis is solid, then you’ll have a good base to work from. Obviously the more solid the body the easier it will be to restore it. Don’t worry, though, if portions of the body like the fenders and doors are rusted as we have replacement panels to help you with that.

2. Restore the C/K’s Mechanics — Undercarriage, Suspension and Chassis

The purpose of any restoration venture is to get your 1967-1972 Chevy pickup mechanically sound and ready to drive. Consider the suspension, exhaust, engine, undercarriage, chassis, electrical components and other mechanics.

Begin by cleaning the entire truck to get rid of dirt and other contaminants. Cleaning everything off will also help you see damage like rot, cracks or corrosion. If you have the right equipment and space, lift the engine and transmission out to better inspect and work on them.

Take note of what panels and parts need to be replaced or refurbished. Start taking the body panels off the truck’s frame (take pictures and/or videos as you go so that you remember where everything goes. This will really help when putting it back together, especially if the project takes a long time to finish).

If you’re keeping the suspension, depending on the level of restoration you want to do, you can either pull it all so that it can be restored, or you can just clean it in place. If you’ve decieded to replace it with something more modern, then just take it all off.

Other major items to replace or restore are:

  • Brakes: If you’re keeping them stock, look at the brake pads, rotors and brake fluid to ensure proper functioning. You may need to replace the brake lines or bleed the brakes. If you’re replacing them, yank it all.
  • Wiring and Hoses: Same as above. For a resto, go over all of these and anything rubber will most likely need to be replaced. If installing all new, you will want to lay out the truck’s wiring and hoses to figure out how you’re going to route everything.
  • Engine: Depending on the condition of your engine, you may need to replace it or restore it with a few aftermarket parts.
  • Exhaust: Similar to the wiring, think about how the exhaust is going to be routed so that you leave room for it during the build. Keep in mind minimum distances that should be kept from wiring, the fuel tank, etc so that the heat transfer doesn’t affect any of these items. If it’s too tight, you may need to wrap some of the exhaust in ceramic heat shield.
  • Suspension: Although it’s an extensive task, you will want to inspect each suspension component to see if they’re faulty. If you want, you can upgrade or replace the suspension system.
  • Transmission: Change the transmission fluid and inspect it for dirt or metal flakes. Flakes of metal can indicate a more severe issue compared to dirt, which just means the fluid is old. Rely on an expert mechanic to clean the inside of the transmission or to rebuild it.
Change the transmission

3. Start Disassembling and Refurbishing the Exterior

Once the mechanics are set, you can focus on the body and frame of your C/K Chevy pickup.

Take apart the vehicle by starting on the inside, and look for worn parts that will require replacement. Keep all the pieces organized and labeled (masking tape and a sharpie are your best friends), and lay them out in a way that makes sense when you go back to reinstall them.

Check the exterior components and salvage any parts you can. If you can’t use them, start ordering new door panels, rocker panels and fenders to avoid project standstills.

  • Rust: Rust is the destroyer of almost every classic car that hasn’t been maintained. If rust exists on the surface-level of the truck, you may get away with cleaning it off. If the rust has caused deeper damage, you can replace your panels.
  • Truck bed: Many classic pickups feature a wooden pickup bed, but after years of neglect, the wood often rots. You can restore the foundation with new wood or rely on aftermarket bed panel solutions.
  • Paint: Light touch-ups are possible if your Chevy’s paint has a few chips, but if there is extensive damage to the exterior, you’ll need a complete repaint. If you have advanced skills, you can take on the project yourself. You can also trust the expertise of a body shop, especially if you’re looking for a period-correct C/K paint restoration. Keep in mind that good paint jobs will easily run into the thousands of dollars.

When you partner with Raybuck, you can feel confident that all the parts you need are in one place.

4. Finish the Interior Components

Interior restorations can range from a deep cleaning to gutting the entire inside. If your Chevy C10 requires a bit more work than a quick clean, you’ll want to start by removing each component and cleaning it from top to bottom. With each part, decide if you can restore it or if it needs to be replaced.

Interior updates

Make sure to eliminate any rust found on the interior body panels. You may need to restore or replace the truck’s carpeting and headliner. Other parts include:

Put it all back together and get it ready for the road. Depending on the initial condition of the truck, and the extent of the restoration/modification, it may take months or years to finish, but there’s no better feeling than getting it out on the road. No matter how frustrating the project gets, keep positive knowing that you’ll enjoy it for many more years than you worked on it 🙂

1967-1972 Chevy Truck Restoration Parts From Raybuck

Raybuck Auto Body Parts has a massive inventory of restoration parts and replacement panels for your 1967-1972 C/K pickup. We carry C10 restoration parts and body panels, along with interior and exterior trims, weather stripping, insulation and rustproofing. We partner with trusted brands in the industry to help you accomplish a restoration to your standards.

Our exact replacement aftermarket products uphold competitive pricing standards so that you can save money on your project and get quality results. Our body panels are made from heavy-gauge stamped steel with a thickness that matches or exceeds that of the original C/K part. Our experts work to provide superior solutions to boost the look and performance of your classic second-generation Chevy pickup.

Since 1985, we have sustained a long-standing reputation for quality products and services by honing our product line to be the best in the industry. We are truck enthusiasts, too, and value your C/K restoration venture.

Order Chevy C/K Restoration Parts Today

Browse our restoration solutions and 1967-1972 Chevy C/K body panelsReach out to our customer service team for more information about our solutions and how we can aid you in finding the parts you need for your Chevy restoration project.
Shop Chevy C/K parts

Categories
Tech Articles

How to Reupholster Truck Bench Seats

How to Reupholster Truck Bench Seats

When fixing up or restoring an older truck, chances are the inside of the cab needs your attention just as much as what’s under the hood. With the right preparations, supplies and instructions, reupholstering truck seats doesn’t have to be a daunting task. This guide provides an overview and instructions for removing old upholstery and how to reupholster a truck seat.

Tools and Materials Needed

A successful project starts with making sure you have everything required for a job well done. To reupholster a seat, you will need these primary tools and materials:

  • A two-piece upholstery kit that has everything you need to replace the old material
  • A one-inch or two-inch foam replacement seat pad (based on your requirements)
  • New hog rings
  • Fastener remover
  • Locking pliers
  • Screwdriver and/or ratchet
  • Hog ring pliers
  • Vice (optional)
  • Marker (Sharpie works well)
  • A single edge razor or something sharp and precise for cutting the fabric
  • Seatback hinge covers (if it’s necessary to replace the existing ones)
  • Wire to repair broken springs or perimeter wire

How to Remove the Old Truck Bench Seat Upholstery

Now that you have all your tools and materials in place, it’s time to get to work stripping the old upholstery from your truck’s seat. After you’ve taken the seat out of the truck (Note: For older trucks from the 30s, 40s, and 50s, the seat frame can remain in the truck and the seat back and bottom can be unscrewed and removed separately.), follow these steps:

  1. Place the bench seat on a sturdy workbench or table.
  2. To separate the two parts of the seat, pull off the hinge cover trim pieces on the back bottom edges to get access to the hinge bolt. Then remove the bolts on both sides. Pull apart the two pieces, placing the seatback to the side.
    Pro tip: Apply some lubrication around the bolts a few hours in advance to loosen them up and make your work easier.
  3. Flip over the truck bench seat and identify how and where it is attached. If your seat cover is attached with a tension wire, note the location of the tension wire that keeps the seat intact. You’re going to remove the wire, but you need to remember where to reattach it later on. Gently snap it loose using your pliers.
  4. Take out all the bolts that hold the seat tracks in place. Once loose, remove them along with the tension wire and place them to the side. While following these auto upholstery instructions, make sure to keep all of the pieces and parts you are removing organized so you know which side of the seat they belong on when reattaching.
  5. Older trucks primarily used hog rings and/or metal clips around the entire perimeter of the seat. Starting in the 1950s, metal clip bars and then plastic clips were incorporated. If your seat cover is attached with hog rings or metal clips, cut the hog rings off with snips and remove any old clip. All other clip bars and clips can be unclipped.
    Remove hog rings and clips
  6. Once you have removed the hog rings and/or clips, pull off the old upholstery.
  7. If you are going to replace the seat foam, note its placement and shape prior to removing it. You will want to use it as a template to cut the new seat foam if possible. If it is unusable, then just cut the new seat foam to match the seat frame. Do not wrap the foam over the edges of the frame. If wrapped over the frame, the new seat cover most likely will not fit properly and may even tear when being installed.
  8. Follow the same process for the seatback, starting by removing the hog rings and then pulling off the old cover.
  9. Now you’re left with the bench frame and springs and the seatback. Carefully inspect to ensure the seat frame is not damaged and the wire is still intact and has ample spring left in it. Also, make sure there is no significant rust.
  10. Repair any damaged springs.
  11. Clean the frame and scuff it to prep for painting. Paint it and let it dry completely.

How to Install the New Upholstery

The next step in how to reupholster truck bench seats is the most technical. Follow these auto upholstery instructions closely:

  1. Lay out the frame on a table.
  2. If the seat foam underlayment material cannot be reused, replace it with an indoor/outdoor carpet material. This will protect the seat foam from being cut/damaged by the springs.
  3. Put the foam in place over top of the underlayment material, making sure it’s centered. Trim the foam around the edges of the frame.
  4. Grab your new upholstery and lay it out on top of the frame, centered (and in line with the seatbelt pockets if equipped). Pull one side over the edge of the frame and tuck it in or attach it with a hog ring, depending on your frame configuration. Come around to the other side and do the same. You’ll probably have to give it a pull and work it around the edge to get it in place. Go all around, checking to see that everything is symmetrical, and none of the foam is showing and all of the springs and frame are covered.
    Pro tip: Lay out the vinyl in the sun for a while or put it in a warm place in your house or garage to make it more elastic and easier to work with.
    Reattach hog rings
  5. Flip the frame over, and starting at the center, pull the edge of the upholstery over the back end. Starting at the center and working your way outward, use your hog ring pliers to attach the vinyl to the frame and springs with the hog rings. This method helps ensure a smooth fit with proper and even tensioning.
  6. Turn the seat over and find the seat hinge mechanism on the side of the bench (again, depending on your particular frame). Poke a narrow hole through from the inside with a razor and mark it with your sharpie. Smooth out the upholstery making sure everything looks right.
  7. Flip the seat back over to put the seat tracks back in their original place and reattach the seat adjustment wire.
    Pro tip: This is a good time to lube the seat tracks so they won’t squeak when you put them back in your truck.
  8. Grab the seatback and place it on the table. For older trucks, you can follow the same steps as for the seat bottom. For newer trucks, you’re going to want to have it standing up by the frame attachments. Use a vice on the table to hold it up or ask someone to help you hold it.
    Hold seat back up
  9. If your seatback is a closed back, meaning that the entire rear portion of the seat is covered, cover the seat with plastic garbage bags to make it easier to put on the new upholstery. Take the new cover and slide it over the top of the seat. Pull it down gently and slip out the garbage bags. Make sure it fits in place.
  10. Clip the hog rings to the metal wire to secure the vinyl to the seatback.
  11. Reattach the two pieces using the original parts. Remember to attach your existing, reconditioned or new seat hinge covers.

Congratulations! You now know how to reupholster a bench seat.

How to Replace Truck Bench Seat Upholstery Video

Shop Auto Upholstery From Raybuck Auto Parts

We’ve been providing top-quality aftermarket parts at competitive prices since 1985. Shop our website for a complete range of premium replacement products, and contact us online today to request assistance in placing your order.
Shop Upholstery Kits »

Categories
Product Information Tech Articles

The Ultimate Rust Removal Liquid


rust release article banner

Rust Release is the best liquid rust removal tool that you’ve probably never heard of. It has been around for years but was primarily focused on the industrial market. Companies that had large yards full of steel beams and pipes spent big money removing rust from these products prior to shipping them to a job. Prior to Rust Release, these companies used acidic chemicals or sandblasting to remove the built-up surface rust.  The chemicals were expensive and caused disposal problems since they were not biodegradable. Sandblasting is labor intensive and therefore expensive. Now these companies fill huge tanks with Rust Release and simply dip their products in it. The product can be re-used, and once completely consumed, it can be disposed of in an environmentally friendly manner. The fast acting solution saves time for this cleaning process, and the fact that it is biodegradable makes disposal easy and inexpensive. It’s a win-win!

We’ve partnered with the makers of Rust Release to bring this awesome product to the end consumer!
Shop Rust Release »

5 Ways to Use Rust Release Rust Remover

Rust Release used on sockets

Think of all the uses for this type of product around your house or shop:

  • Cleaning old hand tools
  • Removing rust from car parts
  • Cleaning out an old gas tank
  • Cleaning an old gun
  • Removing the rust from your kid’s bike’s chain (since they left it out in the rain)

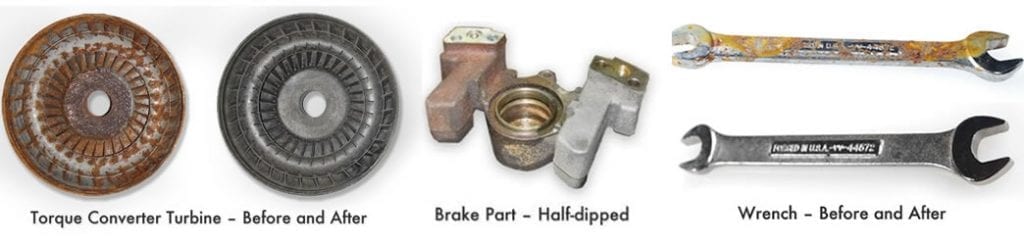
Rust Release will safely remove rust from steel, copper, iron, brass or aluminum and will not tarnish or pit clean metal. It is the safest and most effective all purpose rust removal solution on the market. It will not damage surrounding materials, such as wood, plastic or paint, and is safe on your skin. Rust Release removes corrosion from metal without creating a waste disposal problem, so not only is it cost effective, it’s environmentally friendly!

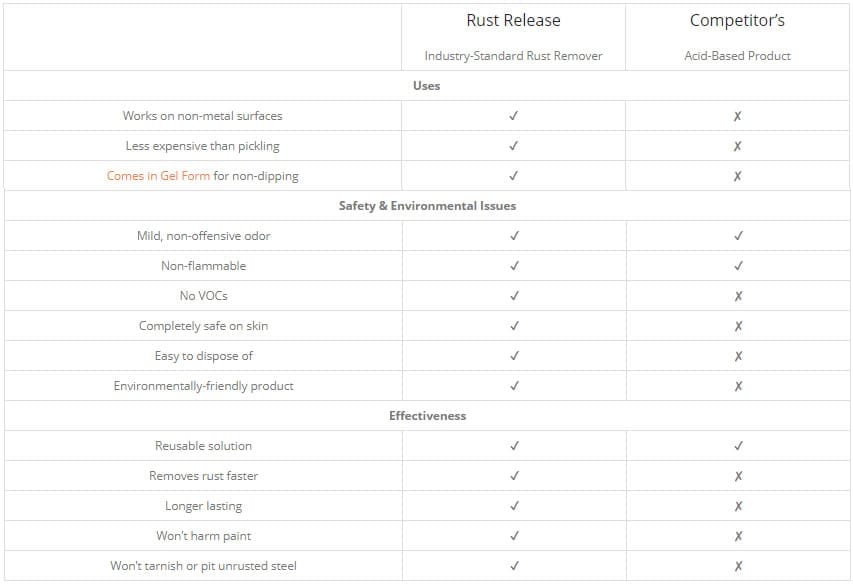
Rust Release works faster and lasts longer than competing products such as Evapo-Rust and Metal Rescue. The primary reason being the pH and surfactant package that is in Rust Release. The pH on Rust Release is 5.5-6, making it a more industrial based product yet still safe for disposal. You’ll get almost twice as much usage out of Rust Release than from its competitors. Rust Release also works better, and is less expensive, than competing acid-based products. See the chart below for a comparison between Rust Release and acid-based products.

Rust Release comparison chart

If you restore cars, this product should be in your garage. Since it’s liquid, it gets into every crack, seam, indentation, and void in whatever you soak in it, which means that you don’t have to worry about internal surfaces still having rust on them. Can’t think of why that would be important? Try cleaning an intake manifold, a set of headers, a water pump, brake calipers, rotors, etc. One might argue that a vinegar mix can perform the same task. There are two issues with that theory: Consistency and Cleaning. Rust Release is made in an ISO 9001 controlled environment which means that every batch is nearly identical. A vinegar mix is absolutely going to vary from batch to batch (unless you’re using straight vinegar). Once an item is soaked in Rust Release, you simply remove it from the liquid and let dry. With a vinegar mix, you need to clean it with a neutralizer (usually baking soda) and then make sure you thoroughly dry it or else surface rust is going to immediately start forming again. A vinegar solution will also affect other materials, such as chrome, paint, etc. For the low cost of this product, I would just keep some in the garage.
Buy Rust Release Now »

Rust Release used on car rearend

How to Use Rust Release

There are three methods for using Rust Release to remove rust off of car parts and tools:

  1. Fill a container with Rust Release liquid and soak your items in it (soaking time varies based on amount of rust). Remove from tank and let dry. For best results, degrease items prior to soaking them as Rust Release will not remove heavy grease or oil deposits.
  2. On light surface rust, spray your metal items with Rust Release and let dry.
  3. For items that cannot be dipped and soaked, such as a frame rail, soak a towel in Rust Release, place the towel on the area that you want to treat, wrap with plastic and let set, remove plastic when ready and wipe surface off.

Some Benefits of Using Rust Release

  • Eliminate the need for sandblasting or pickling
  • Quickly removes corrosion from ferrous and non-ferrous metals
  • Removes rust faster than the leading acid-based products
  • Environmentally-friendly product that is organic, biodegradable, and contains no acids or VOCs
  • Easy to use and is reusable
  • Non-flammable
  • Will not tarnish or pit unrusted steel
  • Will not tarnish paint

Rust Release use examples

Frequently Asked Rust Remover Questions

Q-How does it work?

Rust Release works through a selective chelation process. This process involves a large synthetic molecule bonding with metal and holding it in a solution. Rust Release only bonds to iron, so it can remove iron from iron oxide (rust). Since it only bonds to iron, it will not affect other metals, paints, etc. We suggest taking items out of the solution when the rust is gone. Leaving items in the solution for an extended period of time (days, weeks, etc) after the rust has been removed can cause darkening of the metal and may eventually affect paint, rubber, etc.

Q-What if I can’t dip my product?

Soak a towel in Rust Release, place the towel on the area that you want to treat, wrap with plastic and let set. Remove plastic when ready and wipe surface off.

Q-Can I reuse Rust Release?

Absolutely! Just pour the solution back into the container and store it until you’re ready to use it again.

Q-How do I know when Rust Release is used up?

The bath will turn completely black and will not perform.

Q-Do parts have to be clean before using Rust Release?

No, Rust Release penetrates the dirt and oils. However, grease and dirt will decrease the life of the solution, so we recommended you clean heavy grease and oil deposits prior to dipping.

Q-How long does Rust Release last?

This depends on how rusty the metal is, but one gallon can derust up to 325 pounds of steel.

Q-Will Rust Release harm my paint?

No, it only removes rust.

Q-Will Rust Release remove bluing?

Yes. It will remove bluing but will not remove powder coating or paint as long as the coatings do not contain oxides.

Q-What is the black film that I get on some items that were submerged in Rust Release?

The black is carbon from the steel and can be wiped off with a rag. Items that are flexible, such as saw blades or springs, are made with high-carbon steel to provide flexibility.

Q-How do I dispose of used Rust Release?

Rust Release is considered a non-hazardous product to dispose of. However, local laws vary, so it is recommended you call your local waste management service.

Questions or feedback on this product? Contact us today or leave a comment below!

Categories
Tech Articles Truck Talk

Ford F-100 Pickup Truck History & Restoration Tips

Ford F100 History & Restoration Tips

Back in its prime, the Ford F-100 was one of the leading trucks on the market, and today, it remains one of America’s most iconic pickup series. Ford Motor Company innovated the performance, design and comfort of these vehicles to create a pickup that appealed to not just workers in certain sectors but the general public as well.

If you have an F-100, it may need some restoration work to get it running and looking its best. Raybuck Auto Body Parts is a leading supplier of restoration auto body parts for Ford trucks. We are truck enthusiasts like you, so we understand what it takes to complete the perfect restoration. Understanding your truck’s history and reading through this F-100 restoration guide will help you get the results you want.

Quick links:

History of the Ford F-100 Pickup Truck: 1948-1983

The Ford F-series is the epitome of what it means to own a pickup in the U.S., and it all started with the F-100. Before Ford’s smallest pickup series debuted, little attention was given to the safety, comfort, handling and fuel economy of pickups.

From the start, it was Ford’s goal to create a pickup for people who wanted a true workhorse. However, the seven generations of the F-100 classic truck underwent significant changes over time, and the trucks began to transform into a vehicle that everyone could drive, as well as a tough, dependable truck. The company wanted to make the pickup truck more accessible to the average American as opposed to just commercial fleets and farmers.

Although the series is no longer in production, it’s one of the most sought-after Ford pickups for restoration enthusiasts. Collectors and owners love restoring them and appreciate the build of these old-time trucks. Through our Ford F-100 history and restoration guide, you can learn how to fix up your vehicle and keep in looking like new for years to come.

Ford F-1 1948-1952

First Generation: 1948-1952

In 1948, the Ford Motor Company designed its first F-series, known as the “Ford Bonus Built.” It was the fist pickup available through Ford after World War II. It was a time of innovation and new designs as jobs became plentiful for Americans.

Known as the F-1, the half-ton pickup was built on a 114-inch wheelbase — 7 inches wider than previous models. The design of the front fenders was taller, wider and appeared as a single, coherent piece. Ford also molded rounded rear fenders and a horizontal, rather than vertical, grille. They moved the doors forward by 3 inches for easier access and added a three-way ventilation system with vent windows.

Another nickname for the F-1 was the “Million Dollar Cab” because it had more features and updates than previous trucks. Ford sold thousands of pickups in the first year, making it their best year of sales since 1929.

In 1950, sales increased because the U.S. was heading into the Korean War, and customers worried that it would lead to limited availability. A single bar grille and protruding headlights were introduced in 1951, and 1952 saw few changes.

Shop 1948-1952 Ford Truck Parts

Second generation Ford trucks 1953-1956

Second Generation: 1953-1956

Only five years into manufacturing the F-1 pickup, Ford celebrated its 50th anniversary in 1953. To commemorate their achievement, they renamed the F-1 to the F-100. It’s now one of the more prized collector’s items. Ford F-100 pickup trucks were referred to as “Effies” by enthusiasts worldwide.

It was the first generation to get rid of flathead engines by upgrading to an overhead valve, also known as a “Power-King.” The Y-Block V-8 engines could reach up to 130 HP, which was a big deal back in the day.

New features of the second-generation pickup included wood floor beds and a low floor to ground height. More curves characterized its longer hood, and the truck now had a double-bar grille. One of the major contributing factors to the F-100’s popularity was a curved windshield known as the “Big Window.”

Ford Motor Company — FOMOCO — also began promoting the economic benefits of their vehicles. With the 1954 line approaching, they started promising triple economy benefits from the F-100 model. The trucks began to hold more capacities that could save people money in the long-run.

The 1955 version had an iconic V-shaped grille as its dominant feature and a bigger cargo bed. The “Styleside” body also made an appearance. It formed a smoother transition as the cab and bed of the truck came together. Ford made their cargo bed bigger compared to other manufacturers at the time who were making them only appear wider. The Styleside delivered more space compared to the “Flareside” approaches from previous styles of Ford and other brands.

The 1956 model was the easiest to identify in the second generation because it had a complete body alteration that included vertical windshield pillars.

Shop 1953-1956 Ford Truck Parts

3rd generation Ford truck 1957-1960

Third Generation: 1957-1960

In the late 1950s, Ford introduced practical feature updates as well as style-related modifications to the F-100 series. With a more streamlined appearance, the Styleside pickup was ahead of the game when it came to power, comfort, safety and load capacity features.

The 1957 model came with a full redesigned look as compared to the 1956 version. With its squared-off fenders, the truck had four headlights, not two. It also had two-tone paint for enhanced aesthetics. Ford created a custom cab upgrade that featured color-keyed upholstery, along with other improvements such as an illuminated cigarette lighter, sun visors and custom cab script on the doors. The third generation saw many changes to the grille.

In 1959, FOMOCO introduced the four-wheel-drive option in their factory-built vehicles. Before, they had to get the trucks converted into four-wheel drive. Many manufacturers at the time began exploring how they could do it themselves in the factory, which eliminated the need to outsource.

If you’re restoring your third-generation F-100, Raybuck offers various high-quality parts that can help your 1957-1960 pickup look and function as well as it did in its heyday.

Shop 1957-1960 Ford Truck Parts

4th generation Ford truck 1961-1966

Fourth Generation: 1961-1966

In 1961, Ford developed the “unibody” style. The Styleside pickup from the generation before was one of the most popular classes in the current market. Therefore, Ford wanted to introduce an even more appealing version.

The unibody pickup had enhanced stylistic features that also reduced the company’s manufacturing costs. They decided to eliminate the gap between the cab and bed of the truck to give the vehicle a sleek appearance while boosting storage space.

Although it looked amazing, it was quite controversial. When people began hauling things with the rig, it went downhill. There was little to no flexibility with the new design, causing too much weight to fall in the back. As a result, drivers experienced twisting issues. Doors would also open at random or not open at all. The rocker panels would rust easily from improper door sealing, too.

The unibody was the first design that didn’t go as planned. So, Ford got rid of it and developed the Twin-I-beam suspension in 1965. The new suspension had coil springs instead of leaf springs, as well as larger shock absorbers to make for a smoother ride. The F-100 also went back to two headlights and positioned Ford lettering at the center of the grille.

In 1965, the name “Ford Ranger” appeared as a package option within the F-series models. Ford then revealed a four-door crew-cab F-100 in 1966, which made it easier for people to transport passengers. It was a major selling point that we often can’t imagine our current vehicles without.

Raybuck has a multitude of Ford F-100 parts for your 1961-1966, fourth-generation pickup. We are here to support your restoration projects, whether you’re conducting a complete or partial restoration.

Shop 1961-1966 Ford Truck Parts

5th generation Ford truck 1967-1972

Fifth Generation: 1967-1972

By the fifth generation, the curved hood was reduced and became straight-edged or squared-off. Ford began focusing on the masses by designing a truck for everyone — not solely for workers. They started with a complete restyling of the pickup and began offering more engine options. Trucks used to be pretty standard, but at this point, you could choose between many features.

The company was known for offering packages that catered to different types of drivers. For example, they provided the Camper, Contractor and Farm and Ranch Specials. Other features included a wider cab and more trim choices. 1967 was also the year FOMOCO changed the chassis and body styles of the F-100s. The generation was referred to as the “Bumpside” truck because of its wider bumpers.

In 1968, Ford introduced window cranks, armrests, interior door handles, heater control and upper trim molding. The new components were geared toward a more ergonomic and comfortable ride for passengers and drivers alike. In 1969, Ford brought in the V-8 engine, which was 390 cubic inches. The rest of the years in the fifth generation saw small changes. In 1971, Ford sold about 515,400 pickups — a record-breaking achievement.

When you’re ready to restore your 1967-1972 F-100, Raybuck has a vast selection of parts and body panels for your project.

Shop 1967-1972 Ford Truck Parts

6th generation Ford pickup 1973-1979

Sixth Generation: 1973-1979

Ford Motor Company continued with the squared-off look of the previous generations, then transferred it to the headlights by getting rid of the rounded versions. In 1973, Ford designed what was known as the “Dentside” model because engineers got rid of the bump component. The truck also underwent grille and headlight changes, along with the addition of body side moldings.

In 1974, a new F-100 model was released called the Supercab because of its extended chassis. 1974 was also the first year where the truck underwent no grille changes. Additional comfort components appeared in the sixth generation, including updated heating and air conditioning.

In 1977, the Ford F-100 was dubbed “America’s Favorite Pickup.” By 1978, Ford sold more than 1.3 million F-series trucks, solidifying their popularity in the USA. The company also came up with their famous slogan in 1979 — “Built Ford Tough.”

F-100 restoration projects require high-quality parts. Raybuck has an extensive inventory of 1973-1979 Ford restoration parts and panels that can accommodate both large and small restoration projects.

Shop 1973-1979 Ford Truck Parts

7th generation Ford truck 1980-1983

Seventh Generation: 1980-1983

The seventh and final generation of F-100s began to experience a decrease in popularity because the F-150, introduced in 1975, was the new up and coming truck. By 1983, Ford discontinued the company’s smallest, classic trucks. Over time, the F-150s rose to be America’s favorite pickup.

If you own a 1980-1983 F-100, Raybuck knows how much you value your pickup. Restoration requires precise solutions, so we carry a large inventory of F-100 restoration parts and body panels to keep your truck looking and performing its best.

The F-series is one of the country’s favorite pickup trucks, and it heavily influenced how manufacturers produce pickups today. As of 2020, the brand will be celebrating 72 years of engineering F-series trucks.

Knowing the history of your particular Ford can help you understand which parts were the most prominent and game-changing for its era and give you ideas on how to restore your vehicle.

Shop 1980-1983 Ford Truck Parts

Ford F100 restoration tips

Ford F-100 Restoration Tips

Before revving into the restoration process, consider a few tips to help you from start to finish. It’s always a good idea to plan out the process and determine your overall expectations for the project. No matter if you have one of the first F-100 models or the latest, you will want to put significant time and consideration into your restoration.

1. Do You Need a Full or Partial Restoration?

A full restoration involves restoring every component of your pickup, including its engine, suspension, floors, body panels, interior and more. If you choose a partial restoration, you will be focusing on particular areas on your Ford.

As a third option, you can also consider RestoMod — part restoration and part modification. You can combine the classic components of your vehicle with modern technology. It’s a way to keep the original style of your F-100 while also enjoying modern comforts and capabilities.

2. What Is Your End Goal?

Start by asking yourself what you want to get out of the restoration project. Do you drive your F-100 every day? Do you display it at car shows? How you use your pickup will help determine which changes you want to make. You can also decide which pieces mean the most to your project. You may want to include only original features or try to create a unique look by adding modern components as well.

As you’re figuring out your goals, create a schedule. Can you take your time on the restorations or do you have a strict timetable?

3. What Is Your Budget?

Figuring out how much money you can spend will help you obtain your restoration goals. You can even restore one component at a time in order of importance. This approach can help you stay on budget while ensuring you get the most vital upgrades done.

4. Do You Have a Proper Workspace?

Having the right workspace can make all the difference in a restoration project. You will need a big enough space, such as a workshop, barn or garage, and will also need to invest in the correct equipment and tools — everything from simple drills and car jacks to welding materials.

5. Are You Buying an F-100, or Do You Have One Already?

If you have an F-100 you bought ages ago, you’re off to a good start. However, looking for an F-100 can be a bit challenging. You will want to find one with minimum damage, rust and corrosion. You will also want to find as many of the original parts as possible, especially the trim. Make sure to research the truck and determine the expected repair costs of different options.

Other things to look out for are how much it’s been driven and what its storage facility looks like. Be wary of any that may have spent the better part of their lives outdoors in the elements. Make sure to conduct a thorough inspection and check its VIN.

6. Do You Want to Include Wood Floor Beds in Your F-100?

The second generation of Ford F-100s began the integration of wood floor beds. Some generations may look better without, while some can gain an enhanced, retro look. The boards give your truck more of a 1960s look with a fresh exterior. You can choose to invest in a kit or craft your own wood floor bed design.

DIY restoration enthusiasts can choose to renovate their vehicle to its original design or add personal touches. You can opt for a wood floor bed or choose a RestoMod approach. Your options are endless, no matter what F-100 year you have. By following our tips, you’ll be on your way to getting your truck back into mint condition.

Shop Ford F-100 Restoration Parts Online Today

Raybuck Auto Body Parts offers high-quality Ford F-100 restoration parts and body panels to help you complete a successful restoration. Our experts are here to help you economically restore your vehicle and meet your project goals.

Browse our inventory or contact us online to speak with our knowledgeable staff. We provide competitive pricing and offer guidance to help you through the restoration process. Raybuck employees are truck people like you and use our parts on our projects, too.

Contact Raybuck

Categories
Tech Articles

How to Adjust Headlights

How to Adjust Your Headlights

Your headlights allow you to see the road clearly at all times. If you don’t adjust them properly, however, they can’t do their job. Improper headlight alignment can blind other drivers and make it harder for you to see.

You might need to fix your headlight alignment if:

  • You replaced your headlights
  • Your vehicle was in a collision
  • You’ll be carrying more weight than usual

Before you drive your vehicle at night, you should make sure the headlights are aimed properly. You can adjust them using this simple process and tools that you already have.

Tools and Materials You’ll Need

To adjust your headlights, you’ll need a ratchet or screwdriver that matches your vehicle’s headlight adjusters. Headlight adjusters are in different locations on every vehicle. You can check your owner’s manual to find them or look for the adjustment screws adjacent to or behind the headlight. Once you know what kind of screws your vehicle has, you’ll be able to choose an appropriate tool.

In addition to a ratchet or screwdriver, you’ll also need:

  • A measuring tape
  • A dry erase marker
  • Painter’s tape
  • A wall or flat surface
  • A piece of cardboard or jacket thick enough to block light
  • At least 25 feet of space

Steps to Aim Your Headlights

For you to properly align your headlights, your vehicle should be on level ground. You can adjust your headlights inside or outside using this step-by-step process:

  1. Prepare your vehicle: Make sure your tires are filled to the appropriate air pressure and that you have around a half tank of gas (the weight of the fuel will adjust the vehicle’s stance, and you’re more likely to have between 1/4 and 3/4 tank of gas than you are an empty or full tank). If you regularly carry around heavy equipment or supplies, place them in the vehicle as well.
  2. Find the headlight axis: With a dry erase marker, draw a small dot in the center of each headlight. This is the headlight axis. Make sure to mark the center of the regular lights, not the high beams.
  3. Park your vehicle: Park your vehicle right in front of a level wall or flat surface — this could be your garage wall, garage door or a wall in a parking lot. You should have enough room to back up 25 feet in a straight line from the spot.
  4. Jounce the suspension: Bounce the vehicle a few times on all four corners to allow the suspension to settle.
  5. Create a center guide: Using a piece of painter’s tape, put a vertical mark on the wall or garage door in line with the center of your vehicle. Don’t worry about precise measurements — this mark will just serve as a guide. A hood ornament or front license plate can be helpful for determining this.
  6. Mark the headlight axis on the wall: Place a vertical strip of painter’s tape on the wall in front of each headlight axis. The axis dot should line up with the center of the tape.
  7. Measure the height of the headlight axis: Using your measuring tape, measure from the ground to the headlight axis, using the dot as a guide.
  8. Mark the height of the headlight axis on the wall: Measure up the wall and make a mark on the tape at the height of the headlight axis.
  9. Find the headlight cutoff lines: On the driver’s side of the wall, measure four inches below the axis height you marked and draw another line. On the passenger’s side, draw a line two inches below the axis height. These marks will serve as cutoff points when you adjust your lights. The driver side mark is lower than the passenger side mark to reduce the glare seen by oncoming drivers.
  10. Mark the headlight cutoff lines: On each side of the wall, place a horizontal strip of painter’s tape above each cutoff line, making sure it’s level. The bottom of the tape should line up with the drawn cutoff line. This step makes it easier to see the cutoff from a distance.
  11. Back your vehicle up: You’re ready to adjust your lights now. Back your vehicle in a straight line away from the wall. The front of your headlights should be 25 feet from the aiming wall chart you’ve created.
  12. Turn on your lights: Turn off your garage lights or any other light source and turn on your vehicle’s headlights to compare their alignment to the guide. If you’re adjusting your headlights outside, you’ll need to do this work at night.
  13. Adjust your headlights: Use a piece of cardboard or a jacket to block one headlight. Then, use your ratchet or screwdriver to turn the other light’s vertical adjuster screws, being careful not to lean on the vehicle. Turn the screw clockwise or counterclockwise until the top of the light lines up with the bottom of your adjustment chart’s cutoff line. When the lights are aimed properly, everything above the horizontal tape will be dark. Repeat the process on the other side. If you notice that your lights are horizontally out of alignment, follow a similar process using the horizontal adjustment screws, to adjust them back to center.
  14. Check the alignment: Remove the cardboard or jacket from the covered headlight and check the finished alignment. The beam from the driver’s side headlight should sit a bit lower than the one from the passenger’s side. This setup gives you proper visibility without blinding other drivers.
  15. Test your lights: After you’ve set your headlight alignment, take your vehicle out for a test drive to make sure the lights provide proper visibility.

Headlight alignment chart diagram

Final Words on Headlight Adjustment

Correctly aimed headlights allow you to drive safely. This headlight adjustment method is easy enough for anyone to do at home. However, since all vehicles are different, you should check your owner’s manual before adjusting your headlights, since some manufacturers require different measurements. Also, remember that you may need to adjust your fog lights or high beams separately, depending on your vehicle. You can use the same adjustment process to aim these lights as well.

If you have questions about aligning your headlights, you can always contact the team at Raybuck. We’d be happy to provide additional tips for your vehicle’s make and model.
Shop Headlight Assemblies & Parts »